Version 3
- 2nd December 2007: Version 3
- 15th November 2007: Version 3
- 7th November 2007: Version 3
- 5th November 2007: Version 3
- 24th October 2007: Version 3
- 12th October 2007: Version 3
- 10th October 2007: Version 3
- 1st October 2007: Version 3
- 27th September 2007: Version 3
- 25th September 2007: Version 3
- 14th September 2007: Version 3
- 4th September 2007: Version 3
- 28th August 2007: Version 3
- 27th August 2007: Version 3
- 17th August 2007: Version 3
- 23rd July 2007: Version 3
- 24th June 2007: Version 3
- 22nd June 2007: Version 3
- 10th June 2007: Version 3
- 8th June 2007: Version 3
- 6th June 2007: Version 3
- 11th March 2007: Version 3
2nd December 2007: Version 3
MIDI and Keyboard Learn
The MIDI and keyboard learn feature allows you to quickly and easily specify an action to go with a specific key press or MIDI note. Under the settings in either MIDI or keyboard settings you will notice that it displays the last trigger to occur. You simply then need to click on the action in the tree to assign this trigger to that action.
 Back to top
15th November 2007: Version 3
Play In Selection Order
If you are in multi edit mode and you want to link a series of clips together in a certain order then you can do this quickly by using "Play In Selection Order". First you need to select the clips in the order you wish to play them. Now open the edit menu (right click on a selected clip) and under "Link" select "Play In Selection Order", this will now assign the links in the order you selected the clips. You will still need to selected the link type separately.
 Back to top
7th November 2007: Version 3
Clip Rewind
If you are playing video or flash you may want to rewind it back to the start either when it is playing or once it has finished playing. You can now do this by holding down the {Ctrl} key while clicking on the clip. If it is playing then it will immediately rewind back to the start and play again.Clear Layer Link
You can now link a clip to a layer clear clip. This allows you to automatically clear the screen when a clip ends or if you press Go.
 Back to top
5th November 2007: Version 3
Clip Layer Indicator
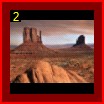
If you set a clip to be displayed on a certain layer it will now display the layer number in the top left corner of the clip panel.
In the example below, the clip has been assigned to Layer 2.

Multi Clip Edit
You may find yourself wanting to change the settings of more than one clip at a time. Click here to learn how to use Mulit-Clip Edit.Clip Play State Indicator
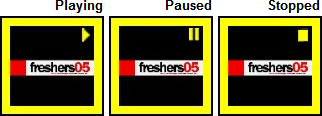
If a clip supports playback control then it will now show the current playback state in the top left of the clip panel. Three icons indicate the three play states..

 Back to top
24th October 2007: Version 3
- Google
Earth Plugin
A separate plugin is available to allow you to display and control Google Earth.
Click here to visit the website for the plugin download.
 |
You will need to be logged into the Screen Monkey site in order to visit the page where the download is. |
12th October 2007: Version 3
Multiple File Drop
You can now drag and drop multiple files from Windows Explorer into Screen Monkey. When you do this all the supported files are added as clips.
 Back to top
10th October 2007: Version 3
Display Profiles
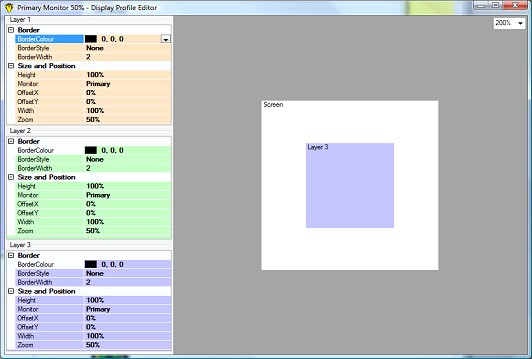
With the increased capability of layers came the need for an improved system to setup the screen. That new system is display profiles. A display profile is a pre-defined setup for the layers including the position and size of each layer. You can either select from a list of default profiles or create your own by clicking on the new profile button in the Screen Monkey settings window.

This will open the profile editor which you can use to change the layers and screen to any desired layout.

This replaces the monitor and zoom settings in previous releases.
 Back to top
1st October 2007: Version 3
Video and DVD Volume
Change the volume of both a video and DVD clip. To change the volume open up the cue window for the clip and adjust the volume slider.

This will adjust the volume used when playing the clip. You can also adjust the volume during playback in the live monitor but this only has an effect until the clip finishes. The next time the clip plays it will play at the volume set in the cue window.Loop Video
You can now loop video by turning on loop in the cue window. When loop is set the selected portion of the video will continuously play. It is worth noting that when looping a link set to At End will not function as the clip will never end. You can also set the video to loop in the live monitor but this only has a temporary effect until the clip is stopped.

 Back to top
27th September 2007: Version 3
- VMR9
Upgrade
Video and DVD clips have been upgraded to use VMR9 which gives enhanced performance and greater functionality. This means that the overlay technology in previous releases is no longer used.
 Back to top
25th September 2007: Version 3
Multiple Screen Layers
This is an exciting new feature that has many possibilities. Essentially it allows you display multiple clips at the same time by showing them on separate layers. It has many applications and below I have tried to list a few.Lower Third Overlay
Display text in the bottom of the screen to caption live video or display messages.Picture In Picture
Show images and video while still having your live camera feed in the bottom right of the screen.Multiple Monitors
Place the layers on different monitors to control the output of more than one screen at a time.
The layers are controlled by the layer buttons on the left side of the dashboard. To change to a different layer simply click on the layer you want to change to. Any clips you play will be displayed on the current layer and you must be on that layer to clear it again.
Normally a clip will display on the active layer but you can set a clip to always display on a certain layer. This is set in the clip menu under layers. This feature is especially useful when using links.
Transparent Clips
Clips can now have constant transparent output to allow items such as text to be overlaid on top of other clips.Ticker Tape Clip
A new ticker tape clip has been added. This clip will scroll specified text across the screen. My thanks goes to Adam Mummery-Smith for providing this clip plug-in.
 Back to top
14th September 2007: Version 3
Cue Clip Shortcut
A shortcut icon for cue clip has been added to the icon bar. When you click on the icon, all available clips will start to flash, you can then select a clip to put it into cue mode.
 Back to top
4th September 2007: Version 3
Flash Not Installed
A friendly error is now generated if you do not have Adobe Flash Player installed.
 Back to top
28th August 2007: Version 3
GoTo Page
By double clicking on the page number you can type in a page number to jump to.Fade Effect on Video Clip
Removed effects inhibit on video clips to allow video clips to be faded on Windows Vista machines.
 Back to top
27th August 2007: Version 3
Vista Compatibility
Minor changes have been made to improve the compatibility with Windows Vista. This includes changes to Flash and DVD clips. The program is now fully Vista compatible.
 Back to top
17th August 2007: Version 3
Clip Panel Sizes
You now have the option of three panel sizes to be used in the dashboard. The three sizes are Small, Medium and Large which can be changed in the Screen Monkey settings.Winamp Plugin
A separate plugin is available to allow you to display Winamp visualizations in Screen Monkey.
 Back to top
23rd July 2007: Version 3
Unlimited Pages
The page limit of 10 previously present has now been removed. It is now unlimited although the actually number of clips you can load is restricted by the capabilities of your machine.Right Click Page Jump
If you use the right mouse button to page up or down, it jumps by 10 pages at a time.Resizable Dashboard
The main window is now resizable to allow you to change the number of clips displayed on a single page. Please note that it is not resizable in toolbar mode.
 Back to top
24th June 2007: Version 3
Link Icon
If a clip links to the next clip then this is indicated by a chain link icon in the top right of the clip panel.
 Back to top
22nd June 2007: Version 3
WPF Support
Support has been added for Microsoft's latest display technology WPF. This brings the advanced capabilities of Windows Vista into Screen Monkey.
 Back to top
10th June 2007: Version 3
Save and Open
Save your current show to an XML file which can be either loaded on a different computer or re-opened on the current machine. You can also click on new show to quickly clear all the clips.Multiple Instances
The restriction of opening more than one copy of Screen Monkey on a single PC has been removed. This gives you the option to control more than 1 display on a single computer. When you open multiple copies, all the settings are saved separately so each instance will maintain its own settings even when closed. The settings are re-opened in the order you originally ran the application.
 Back to top
8th June 2007: Version 3
Interactions Plug-In Framework
The interactions plug-in framework allows 3rd party developers to write Plug-Ins which control Screen Monkey. An interaction can perform functions such as change page, run clips, pause playback and much more. You can see any loaded interactions plug-ins by going to the Screen Monkey settings menu and clicking on the interactions.MIDI Control
The new MIDI control interaction allows you to specify MIDI notes to perform certain actions within Screen Monkey. This gives you huge capability to connect external control surfaces and other MIDI devices such as lighting desks. The MIDI notes used to perform a specific action need to be setup in the settings window under MIDI before it will respond to MIDI notes. You will need a MIDI port connected to your computer or a MIDI to USB adapter.Mouse and Keyboard Interaction
This feature was originally conceived out of a request to always have the mouse in control of a PowerPoint presentation. I wanted to allow one mouse to be assigned to Screen Monkey and the other left free to use in Windows. What resulted was an extremely powerful and flexible mouse and hotkey system. The principle is that you have actions you wish to perform in Screen Monkey like run a clip. This interaction allows you to assign any mouse or keyboard key to that action. So if you assign the right mouse key to play clip 1 it will play clip 1 when you press the right mouse key. It gets better than that though as you can connect multiple mice and keyboards and assign different actions to keys on different keyboards. So you can have one keyboard dedicated to controlling Screen Monkey while the other keyboard has no effect on Screen Monkey. Best way to understand it is to have a play and do not forget you can always save and load the settings. When you first install Screen Monkey some defaults are setup, to change these select "Mouse and Keyboard" in the settings window.Repair Clip
If a clip is unable to load for some reason, such as a missing file, it will display and error icon on the clip panel. When you click on the clip you will be asked if you want to repair the clip and in the case of a missing file you will be presented with an option to try and locate the missing file. This is specifically useful if you load the show in another computer which does not have your clip files located in the same place.Clearing Errors
If an error occurs in Screen Monkey and you click on the error icon to view the error it will clear the error and the icon will disappear.
 Back to top
6th June 2007: Version 3
Link
This new feature allows you to link multiple clips together so that one clip will follow on from the current clip. This allows you to play a series of clips with a similar result to a cue list. You can set the link to on by right clicking on the clip and then selecting the Link menu. You are presented with three options:
Off |
No clip fill follow. |
Manual |
The next clip will follow when you press the space bar. |
At End |
The next clip will follow when the current clip finishes. This option is only allowed on clips that actually finish like video or PowerPoint. |
Time |
The next clip will follow after a specified time. When you select this option you are presented with an option to enter the time. |
When you first set the link it will always
link to the adjacent clip but you can override this by clicking on the
clip name in this menu and selected another clip.
 Back to top
11th March 2007: Version 3
Freeze Clip Live Monitor
Freeze clips now have a live monitor that displays the image that is frozen.Image Clip Live Monitor
Image clips now have a live monitor that displays the image being shown on the screen.DVD Clip Live Monitor
DVDs have a live monitor which shows the current time, time remaining and allows you to play and pause the DVD during live playback.DVD Clip Cue Export and Import
You can now Import and export the cue in time and out time of the DVD to and XML file. This allows you to save the settings for later or transfer the settings to another computer. Ideal for off site setup.
 Back to top