![]()
Image Clip
The Image Clip allows you to display a static image from a file on the screen. Any supported image type can be displayed.
There are many uses for image clips - holding slides, information screens, lower thirds, logos, slideshows, liturgy, etc. The image clip supports transparency and can be overlaid on top of other layers. Images can also be cropped or re-poisitioned by means of the display profile editor.
Note: In addition to the Image Clip you can also use an image file as a background in a text clip or as an object in a text clip. These options maybe more appropriate depending on what you wish to achieve.
Create an Image Clip
Click on an empty dashboard slot and choose the Image clip type from the create clip dialog. When you add an image clip you are presented with a file browse dialog that allows you to navigate to and choose the image. After selecting the image file it is added to the slot and the thumbnail updates to show the image in the file.

To quickly add a large number of images you can also drag-drop from Windows Explorer onto the dashboard or use the Open File feature of the create clip dialog.
Configure an Image Clip
If the image has the same dimensions as the output resolution of your system then no confiuguration is required.
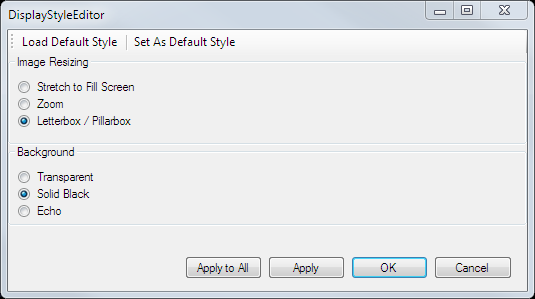
However if the image is a different size and/or aspect radio then you may need to tell Screen Monkey how you want the image to be presented. Right click on the image thumbnail in the dashboard and choose 'Display Options'

There are two parts to the display style settings.
Image Resizing
There are three different resizing options available.
| Setting | Description |
|---|---|
| Stretch to Fill Screen | Your image will be scaled both vertically and horizontally until it reaches all edges of the screen. The image maybe scaled down or up. The orginal aspect ratio will be lost. |
| Zoom | The image will be scaled proportionally to reach all edges of the screen. Some cropping may occur depending on the relative aspect ratios of the image and the screen. The original aspect ratio will be preserved. |
| Letterbox/Pillarbox | The orginal aspect ratio will be preserved and empty space will be created. Depending on the dimensions original image it will be scaled to fill either the horizontal or vertical space. The remaining empty space is configured using the 'Background' options. |
Background
If you choose 'Letterbox / Pillarbox' empty space is created. Choose what is put into this space from the options below.
| Setting | Description |
|---|---|
| Transparent | All lower layers are visible. If the image is on layer 1 then the Windows desktop is visible. |
| Solid Black | Black. |
| Echo | A stretched and blurred version of the original image. |
Apply Settings
These buttons allow you to apply the changes.
- Apply to All Make the change to all images in the current show.
- Apply Make the change to this image. If the clip is live the changes will be made immediately.
- OK Make the change to this image and close the dialog.
- Cancel Make no changes and close the dialog.
Using the toolbar buttons you can also configure the options for all new image clips.
- Load Default Style Apply the default set of options previously saved for this show.
- Set As Default Style Save the current set of options as defaults and use them for all new image clips in this show.
Use an Image Clip in a show
Presenting images is just like presenting other clip types. You click the image and it shows on the screen until you either fade it out or clear the layer it is being presented on.
Image clips can be configured with links, effects, transitions, schedules etc. as described in Clip Settings.
Note: Some image types (such as .GIF) support animation. If you use a .GIF image type and it is animated Screen Monkey will only render a static image and the animation will not occur.