Version 3.1
- 24th May 2008: Version 3.1
- 16th May 2008: Version 3.1
- 4th May 2008: Version 3.1
- 18th April 2008: Version 3.1
- 17th April 2008: Version 3.1
- 30th March 2008: Version 3.1
- 27th March 2008: Version 3.1
- 20th March 2008: Version 3.1
- 16th March 2008: Version 3.1
24th May 2008: Version 3.1
Clip Scheduler
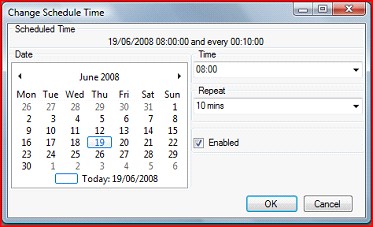
The scheduler allows you specify a time and date when a clip will be run. This is specifically useful if Screen Monkey is running unattended and you need to display videos or images at set times in the day such as with a local TV station. It also allows you to set a repeat time if you want to show a clip every 10min.
Flash Hotkey Inject
The previous version allowed you to specify keys to send to a flash presentation for the purposes of navigation. This has been changed so the flash clip has a specific set of custom actions which you are allowed to assign key presses to. The only noticeable change is that instead of the assignments being listed under "Custom Action" it is now listed under "Flash".Song Words Transition Speed
You can now set the time taken for the song words to transition from one verse to the next. You have four speed options "No Transition", "Fast Transition", "Normal Transition" and "Slow Transition". To set the transition speed go to the song clip display style editor and select the speed you require.

Song Text Effects
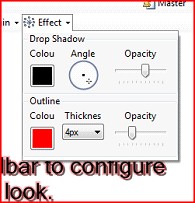
When displaying song words over an image background you often need an effect such as drop shadow or text outline to ensure the words stand out. The new song text effect does exactly this. It gives you the option to add both an outline and drop shadow to the text. Both effects are highly configurable to ensure you get exactly the effect you want. You change the text effect by selecting the Effect button in the display style editor and then adjusting the settings till you get the desired effect.
 Back to top
16th May 2008: Version 3.1
Quicktime Video
Now supports playback of quicktime video as long as you have a suitable CODEC installed.Link At End
When linking a clip at end it will now link clips on all layers and not just the clip on the active layer.
 Back to top
4th May 2008: Version 3.1
Info Bar
The info bar displays information about a clip when the mouse passes over the clip. When not showing clip information it displays information about the live clip on the current layer. You can use this to see information such as the full clip name, duration, slides, link and effect. There is a user setting to hide the info bar if required.

Disable Thumbnail Generation
There is now a new user setting to disable thumbnail generation in certain clips. This is to avoid problems with large numbers of video clips taking along time to load. The thumbnail will still be generated when you cue the clip.Clip Tooltip Length Limit
The name of the clip in the tooltip is now limited to prevent names being ridiculously long.
 Back to top
18th April 2008: Version 3.1
Timeline Resize
The timeline in video and DVD clips now resizes without losing the zoom buttons.Edit Mode Delete
You can now use the delete key in edit mode to clear the selected clips or backspace to remove the selected clips.Hotkey Handled
In previous versions of Screen Monkey any global hotkeys would always be routed to Screen Monkey. This prevented that key from being used in other applications. Now the key is only used in Screen Monkey if that operation is available. For example the next and previous slide hotkeys are only needed if a slide show is actually running. This key will now only be disabled in other applications if a slide clip is being displayed.Show Drop
With show drop you can quickly add clips from other shows saved in Screen Monkey. All you do is drag the show file you want to add clips from into a panel. The clips in that show will then be added starting at this panel. You can use this to create new shows using components from old shows.Clip Forward and Reverse
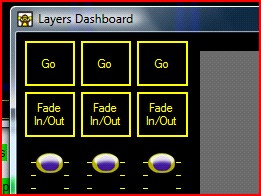
You may have added a number of clips and all you want to do is step through them. The Clip Forward function allows you to do this. When you select Clip Forward it will move to the next clip on the layer which is simply the clip in the next slot. This is different from the linked clip. To move back to the previous clip you just select Clip Reverse. You can either assign hotkeys to the these actions or press the Go button in the Layers Dashboard. By holding down shift and pressing Go it will move to the reverse clip.
 Back to top
17th April 2008: Version 3.1
Insert Clip
This is extremely useful and a feature that has been lacking in previous versions. You often want to add new clips into your play order at the last minute and until now there has been no easy way to do this. Now with insert clip you can add in a new clips and any adjacent clips will be shifted along. All you have to do is add the clip to the slot you want it to appear in. If a clip already exists in that slot then it will be moved to the slot on the right. Previously the clip would just have been deleted.Remove and Clear
As well as inserting a clip you also need to be able to reverse this by removing a clip. So the remove function has now changed behavior. When you remove a clip any adjacent clips will be shifted into the empty slot. The old behavior of Remove is now Clear. When you select clear the clip will be deleted and an empty clot will be left.Docking Layer Monitor Windows
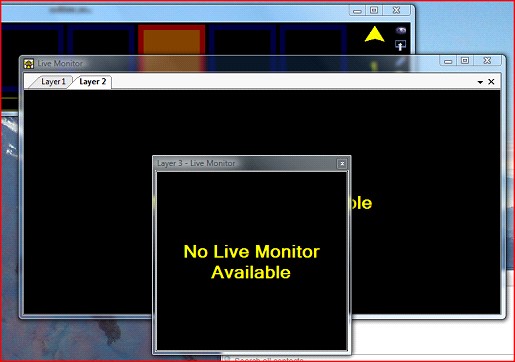
The layer monitors are now all dockable allowing you to configure them in any display layout you wish. So if you want all you layer monitors in tabs on top of each other or all viewable in separate windows you can. This now gives you the ability to easily see what is going on in all the layers at once. To move the windows around just simply click and drag the tab of a layer out of the monitor window.
 Back to top
30th March 2008: Version 3.1
Clear Active Layer
Added Clear Active Layer to the list of possible interactions assignable to a hotkey. This will now clear the active layer currently selected in the main window. This adds to the ability to clear all layers being displayed.Changing Keyboard Types Cleared Hotkey
Fixed a bug where if you changed to a different keyboard type it would lose any hotkey settings.Song Clip Image Background
You can now use an image as a background for the lyrics in a song clip.
 Back to top
27th March 2008: Version 3.1
Clip Interaction Interface
Added new interface which clip plugins can implement to add custom interactions to the interaction interface. When a clip registers a custom action it allows hotkeys or MIDI notes to be assigned to that action. When the user then presses a key the clip is informed of the key press. This is useful if a clip has custom behavior that a user might want to assign to a keyboard key.Song Clip Jump to Verse Hotkey
You can now assign a keyboard key to jump to specific verses in a song. This is useful when you are displaying songs and do not know what order the verses will be sung in. Now you can assign keys to all the verses and when that key is pressed it will jump straight to that verse.Song Clip Live Monitor
Added a live monitor to the song clip which shows you the lyrics for the whole song and a preview of the current output. The current verse is highlighted and you can jump to verses simply by clicking on the verse lyrics.
 Back to top
20th March 2008: Version 3.1
- Song Clip
A new type of clip to display song lyrics was added. This includes a song edittor to quickly enter the lyrics for the song you want to display. It also has the ability to easily see the lyrics you are displaying and skip to the correct verse in the song. A range of display options are available to customize how the lyrics look. You can also search a folder containing lyrics to easily add a song from a database of files.
 Back to top
16th March 2008: Version 3.1
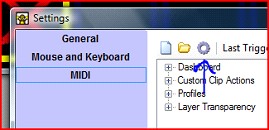
Select MIDI Device
In the MIDI settings window you can now click on the select MIDI device icon to open a new dialog which allows you to select any MIDI device connected to your system. This means that if more than one device is connected, you can choose which one Screen Monkey uses. Once you have selected the device you need to configure which notes perform which actions.
Video Clip Thumbnail Caching
With v3 when the application started it would always have to re-generate the thumbnail images for the video clips. This could be a slow process if you had lots of clips. Now the images are saved when the application closes so they do not have to be re-generated on start up.Video Options
The video options dialog allows you to change how Screen Monkey plays your videos. The default settings have been chosen to give you the best quality and performance during playback. However sometimes due to hardware and system limitations you may experience problems. The options window allows you to change certain settings to give you the best chance of seeing your video. If you are not experiencing problems then it is best to leave these settings. The settings apply to all video clips.DVD Options
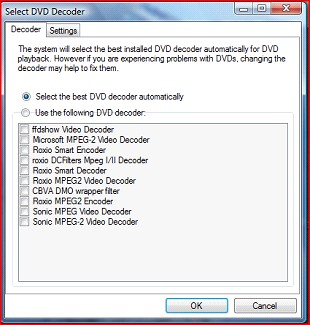
The DVD options dialog allows you to change how Screen Monkey plays your DVDs. The default settings have been chosen to give you the best quality and performance during playback. However, sometimes due to hardware and system limitations you may experience problems. The options window allows you to change certain settings to give you the best chance of seeing your DVD. If you are not experiencing problems then it is best to leave these settings. The settings apply to all clips.
DVD Audio Language and Special Feature Support
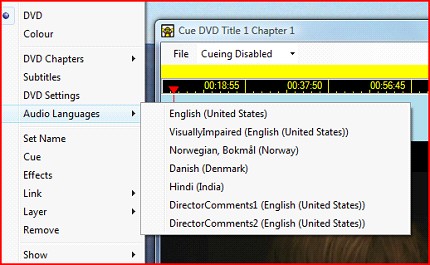
You can now select Audio languages and special features such as directors commentary with DVD clips. To set the language you first need to move to a point in the DVD that supports languages. You can do this with the Cue control. Now right click on the clip and from the "Audio Languages" sub menu select the language you require. From now on that will be the language used.
DVD Menu Button
You can click on the DVD menu button to quickly return to the DVD menu.

Alpha Transparent Image Clips
The image clip now supports transparent image formats such as PNG. Any areas in the image which are transparent will either show the desktop below or any layers beneath. This feature is really useful if you want to display a branding image on one of the top layers. You also need to select Transparent in the clip options.Image Clip Options
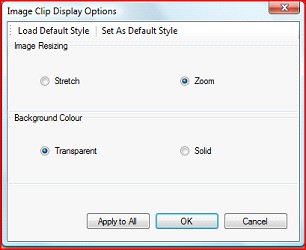
Several options allow you to customize how images are displayed. Image re sizing allows you to either stretch the image to fit the screen or maintain the proportions and show a black border where the image does not fit the screen. You can also set the background to transparent which allows transparent images to display the layers beneath. You can apply the settings to all the images and specify whether these are the default settings applied to all future clips.
Layer Control Dashboard
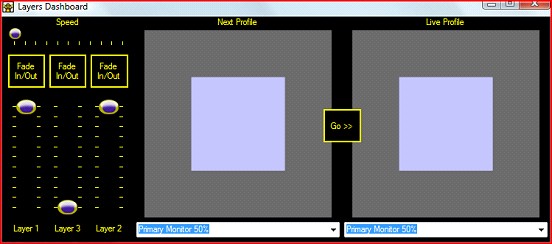
The new layers control dashboard gives you quick access to the setup of the layer. You can change the layer transparency and the display profile currently in use by all the layers. To open the layer control you need to click on the layer icon in the main window.

You will then see the following window from which you can control all three layers.
Live Layer Transparency Control
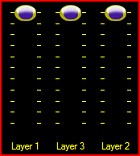
This allows you to change the transparency live of each layer. You can either use the faders in the Layers Dashboard or a MIDI device such as the Behringer B-Control to change the transparency. This gives you the ability to manually fade out media without assigning an effect.
Layer Fade In and Out
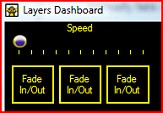
These buttons allow you to quickly fade in and out a layer. They can be useful when quickly putting together a show and when you need to easily take information in and out from the screen while still maintaining the other layers. The speed with which the layer fades in and out is controlled by the speed fader.
Profile Transitions
You may need to go from picture in picture to full screen during a live show. The profile transitions allow you to do that. You can change on the fly the display profile used and it will seamlessly change to that profile with the given speed. If the new layer position is different then the layer will travel to its new position and size.
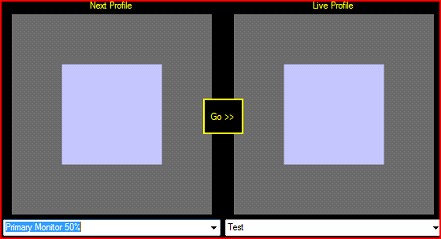
The profile control shows you the current profile and the next profile to go to. An image representation of what the profile might look like is shown. Use the drop down lists to change either the live or the next profile. When you want to change the profile click on the go button and it will transition to the new profile.
The speed of the transition is set using the speed fader.

Please note that some of the transitions are a bit steppy at this time. It is hoped this will be improved in future releases but it was still included to give you any benefits you may find.Previous Clip Action
You can now configure a keyboard key to return to the previous clip. This will cause the current clip to stop and the previous clip to be re-run.Repair All
The repair all will attempt to repair other clips of the same type with the information you provided to repair a clip. This is really handy if you have more than one media file that has been moved to a different folder. In this case it will search for other clips which may also have been moved to this folder and repair these as well.Layer Select Tool Tip
The layer select in the main window now shows a tool tip describing what the buttons do.Per Layer Live Monitor
The live monitor now shows the monitor for the active layer. This was an annoyance with v3 as it would only show the monitor for the last clip. Not allowing you to monitor the layers separately.Active Layer Clip Control
A lot of the clip control actions such as next slide now work for the active layer. This gives you greater control over each individual layer.GoTo Slide Keyboard Action
A new keyboard action has been added to allow you to type in a slide number and then hit a terminating key to goto that slide number. You need to define the terminating key in the keyboard settings and then simply type in a slide number followed by this key.Layer Transparency Indicator
The background of the layer select buttons now fade to grey as the layer becomes transparent. When black the layer is fully visible.

Ticker Tape Setup Opens on New Clip
The ticker tape setup dialog is now displayed as soon as you create a ticker tape clip. This was confusing before as you had to add some text in this dialog before the clip would work.Clip Unable to Stop - Bug Fix
A bug was fixed where if you did not have "Use effects on clip out" selected in the settings it would cause clips not to stop when the clear screen button was pressed. After this any future clips would also not stop and lock on.Custom Layer Shape
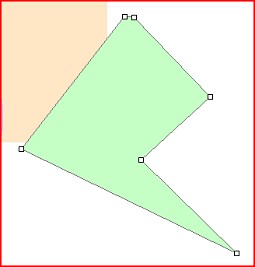
It is not always the case that your screen will be rectangular. Screen Monkey believes that you should not limit yourself to rectangles and that is why it now provides for shaped layers. You can create just about any shape of layer you want.
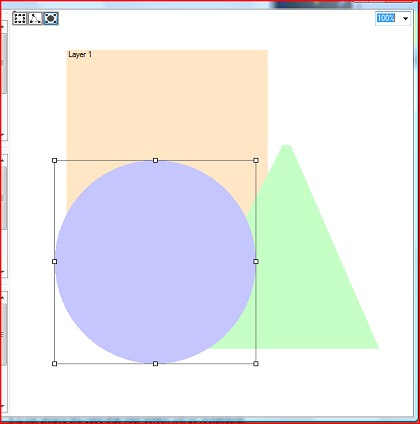
In the profile editor you just need to select what shape you want from rectangle, polygon and circle.

Now just stretch and mold the layer to your desired shape.
Events & Errors Loading Animation
The events and errors dialog now shows a loading animation while the events are being loaded.
 Back to top