![]()
Audio Clip
The Audio Clip allows you to play any audio file stored on your computer to the audio ouptut. The audio output used is configured in Windows audio device settings.
Note: Screen Monkey has no capability to play an audio CD inserted in the computer CD/DVD drive. You will need first to rip it to a compatible file format so it exists as a file on your computer.
Create an Audio Clip
There are three ways of creating audio clips.
- Click on any empty slot and choose the Audio clip. You are presented with a file open dialog from which you may browse the computer and select the audio file you wish to use.
- You may also click and drag audio files from Windows Explorer to the Screen Monkey dashboard.
- Click on an empty slot and choose 'Open File...' from the clip browser, using this method allows you to quickly add multiple files.
The supported audio formats are:
- *.AAC
- *.M4A
- *.MP2
- *.MP3
- *.WAV
- *.WMA
When an audio clip has been added, it is automatically assigned to the Audio Layer and the clip has an A in the top left corner indicating this.

Configure an Audio Clip
A few options are available when right clicking on Audio clips.
Mute
Choose the 'Mute' option to play the clip silently. Select 'Mute' again disable.
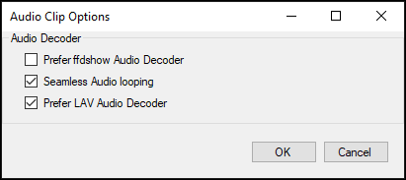
Audio Options
If you experience any problems with the smooth playback of audio clips then the settings in 'Audio Options' may be helpful. These settings are applied globally to all audio clips. The recommended default settings are shown below.

Edit/Cue
The edit/cue dialog allows you to set In and Out points for the media so that the clip only plays a portion of the original file. There is also a volume adjustment which can be used to reduce the audio level if necessary.
Note: In and Out point cues are only supported when using the ffdshow or LAV audio decoder.

Transport Controls Use the transport controls to find in and out points within the clip.
Loop Click to make the clip play in a loop forever. The button icon is green when loop is active. This setting is saved and will apply every time the clip is played. Equivalent to setting a loop type link on the clip.
Volume The audio level may be reduced using the volume slider
Set In/Out Move the playhead to the desired location and click the { or } buttons to set In and Out points.
Clear In/Out Use the cross buttons to clear the In or Out points.
Timecode In/Out View the timecode of the In and Out points.
Padlock When the padlock is locked the cue points are enabled and will be used in playback. When unlocked the cue points will not be used in playback but they are still saved in the clip settings.
Transition
Audio clips maybe faded in and out by applying an 'Audio and Video Fade' transition.
Use an Audio Clip in a show
When presenting a show, you left click the clip icon on the Screen Monkey dashboard to begin playing it. Clicking the clip again will pause playback. Control-Click to restart the clip from the beginning.
You may wish to use the Live Monitor in order to see other playback controls as well as keep an eye on elapsed time and time remaining.

The volume fader adjusts the audio level of the clip. The adjusted volume is not saved and so will have no effect the next time the clip is played. Use the volume fader in the audio clip cue dialog to permanently adjust the volume.
The loop button can be used to loop the clip forever. The loop button state in the Live Monitor is not saved. Use the loop button in the audio clip cue dialog if you need to make the loop setting permanent.
The timecode displays show the elapsed time as well as the remaining time of the clip.